
As you rev up your motorcycle and hit the open road, the last thing you want is for your ride to sputter and stall due to a dirty carburetor. Unfortunately, this is a common issue among motorcycle owners and one that can be easily avoided with proper maintenance.
In this blog, we will delve into the world of motorcycle carb cleaning, discussing the benefits, steps, and tips for keeping your carburetor in top shape. Say goodbye to frustrating breakdowns and hello to a smooth ride as we explore the key to keeping your motorcycle running like a dream. Let’s get started!
Key Takeaway
- Proper maintenance of motorcycle carburetors is essential to avoid breakdowns.
- Regular cleaning of the carburetor can prevent sputtering and stalling while riding.
- Benefits of motorcycle carb cleaning include smoother ride and improved performance.
- Steps for cleaning the carburetor include removing it from the motorcycle, disassembling it, and using carb cleaner
- Tips for successful motorcycle carb cleaning include using the right tools and following the manufacturer’s instructions.
Why You Should Regularly Clean Your Carb
“Maintaining a clean and well-functioning carburetor is essential for keeping your motorcycle running smoothly. Over time, dirt, debris, and leftover fuel can build up in the carburetor, causing it to clog and affect the performance of your bike. That’s where motorcycle carb cleaning comes in.
This process involves disassembling the carburetor, removing any deposits and buildup, and then reassembling it. It may seem like a daunting task, but with the right tools and knowledge, you can easily do it yourself. However, it’s important to note that if you’re not comfortable working with engines, it’s best to leave it to a professional.
To start, gather all the necessary tools and materials, including carb cleaner, a carburetor cleaning kit, and a service manual for your specific motorcycle model. Make sure to also have a clean and well-ventilated workspace. Then, follow the steps outlined in the service manual to disassemble the carburetor.
Once disassembled, use the carb cleaner to thoroughly clean all the parts, including the jets, needles, and float bowl. Use the cleaning kit to remove any stubborn deposits. It’s important to be gentle and not use any sharp tools to avoid damaging the delicate parts.
After cleaning, reassemble the carburetor and reinstall it into your motorcycle. Make sure to follow the correct order and torque specifications as mentioned in the service manual. You can also adjust the air and fuel mixture to optimize your bike’s performance.
Regularly cleaning your motorcycle’s carburetor not only improves its performance but also helps extend its lifespan. It’s recommended to clean it at least once a year or more frequently if you notice any issues with your bike’s performance. In conclusion, motorcycle carb cleaning is a necessary maintenance task that can greatly benefit your bike’s overall performance.
motorcycle carb cleaning
| Column 1 | Column 2 | Column 3 |
|---|---|---|
| Lorem ipsum dolor sit amet, consectetur adipiscing elit. | Sed sed nisi odio, at scelerisque lorem. | In ullamcorper orci ac felis rhoncus, ut commodo erat consequat. |
| Etiam fringilla elit at lacus tempus malesuada. | Nullam aliquet mauris eget erat ornare, a auctor nibh dignissim. | Duis non arcu sagittis, consectetur dui vel, maximus eros. |
| Proin auctor libero in velit efficitur, vitae eleifend nibh consequat. | Nunc auctor mi vitae quam molestie, sit amet pellentesque odio porta. | Nullam non erat in velit euismod placerat. |
| Praesent non elit euismod, cursus ipsum vel, pharetra ligula. | Curabitur bibendum enim nec massa luctus, in pharetra libero faucibus. | Donec ut nulla sit amet elit consequat dictum in eget elit. |
| Suspendisse vitae sapien vitae ipsum malesuada gravida. | Integer nec magna ut sem hendrerit molestie et sit amet nulla. | Phasellus faucibus est in purus tempor, sed scelerisque nisi pellentesque. |
| Quisque a felis auctor, vulputate ex id, faucibus urna. | Curabitur in sem at tellus euismod auctor et eu nulla. | Nulla ac orci nec lorem lacinia ultrices. |
When to Clean Your Carb
Motorcycle carb cleaning is an essential task for any rider who wants their bike to run smoothly and efficiently. Over time, carburetors can become clogged with dirt, debris, and old fuel, causing your motorcycle to experience performance issues. But don’t worry, with a bit of knowledge and the right tools, you can easily clean your motorcycle carburetor and get your bike running like new again.
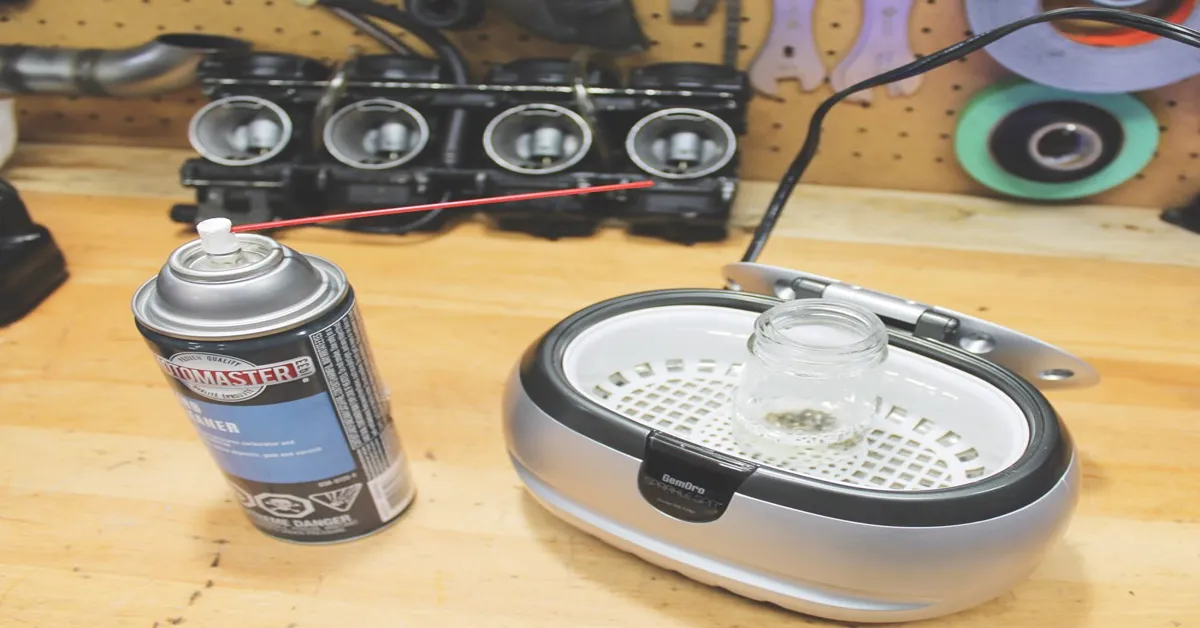
The Tools You’ll Need Before you begin cleaning your motorcycle carburetor, you’ll need to gather some tools and supplies. These include a carburetor cleaner, a soft-bristled brush, compressed air, and a carburetor rebuild kit (if necessary). Make sure you also have a clean work area and some gloves to protect your hands.
Step by Step Cleaning Process Remove the Carburetor – Start by removing the carburetor from your motorcycle. This may involve disconnecting fuel lines, throttle cables, and other parts, so consult your manual for specific instructions.
Disassemble the Carburetor – Once removed, disassemble the carburetor, taking note of where each part goes. Place the parts in a container with some carburetor cleaner to soak.
Clean the Parts – After soaking for a few minutes, use a soft-bristled brush to scrub away any dirt and grime. Rinse the parts with clean water and then use compressed air to blow out any remaining debris.
Rebuild the Carburetor – If you notice any damaged or worn parts during cleaning, replace them with parts from the rebuild kit. This will ensure optimal performance and prevent future issues.
Tools and Materials You’ll Need
Motorcycle carb cleaning is an essential part of maintaining your bike’s performance. Over time, carburetors can become clogged with dirt, debris, and old fuel, causing your bike to run poorly or even break down. Luckily, cleaning your carburetor is a relatively simple task that can be done at home with a few basic tools.
To begin, you’ll first need to gather some supplies. This includes a carburetor cleaner, a small wire brush, and a can of compressed air. It’s also a good idea to have a clean cloth and a container to catch any excess fuel that may leak out during the cleaning process.
Next, you’ll need to remove the carburetor from your motorcycle. This may involve disconnecting the fuel line and loosening any bolts or clamps holding the carburetor in place. Once the carburetor is removed, you can then disassemble it by removing the float bowl, jets, and other small parts.
Now comes the actual cleaning process. Using the carburetor cleaner and wire brush, carefully scrub away any dirt, grime, and residue from the parts. Be sure to clean the jets thoroughly, as these are often the most clogged areas.
Once everything is clean, use the compressed air to blow out any remaining debris and dry the parts. After cleaning, it’s important to reassemble the carburetor correctly. Be sure to refer to your motorcycle’s manual for specific instructions.
Once reassembled, you can then reattach the carburetor to your bike and reconnect the fuel line. Finally, start your motorcycle and let it run for a few minutes to ensure everything is working properly. If your bike is still experiencing issues, you may need to repeat the cleaning process or seek the help of a professional.
Step-by-Step Carb Cleaning Process
When it comes to keeping your motorcycle running smoothly, one of the most important maintenance tasks is carburetor cleaning. The carburetor is responsible for mixing air and fuel in the correct ratios to keep your engine running efficiently. Over time, debris and residue can build up in the carburetor, causing it to become clogged and affecting your bike’s performance.
But don’t worry; cleaning your motorcycle carburetor is a relatively simple process that can be done at home with a few tools and some patience. The first step in cleaning your motorcycle carburetor is to gather all the necessary tools, including a carburetor cleaner, a small wire brush, and a clean cloth. It’s important to note that different carburetor cleaners are designed for different types of carbs, so make sure to choose the appropriate one for your bike.
Additionally, it’s recommended to wear gloves and work in a well-ventilated area. Next, you’ll need to remove the carburetor from your motorcycle. This can be done by following the manufacturer’s instructions or consulting a repair manual.
Once the carburetor is removed, disassemble it and separate the different parts. Pay attention to the order in which the parts are removed, as this will make reassembly easier. Now it’s time to clean the carburetor.
Start by spraying the carburetor cleaner on all the parts, making sure to cover every nook and cranny. Use the wire brush to scrub away any stubborn debris or residue. Then, use the clean cloth to wipe down the parts and remove any excess cleaner.
After the parts are clean, it’s important to check for any damage or wear and tear. Replace any damaged parts before reassembling the carburetor. Once everything is in good condition, reassemble the carburetor in the reverse order of disassembly.
Tips for Maintaining a Clean Carburetor
Motorcycle carburetors play a crucial role in the functioning of the engine, and regular cleaning is essential to ensure optimal performance and prevent potential breakdowns. However, the thought of cleaning a carburetor can be intimidating for many riders, especially those who are new to motorcycle maintenance. But fear not, for we have broken down the process of motorcycle carb cleaning into simple steps that anyone can follow.
First and foremost, it’s important to understand the importance of carburetor cleaning. Over time, dirt, debris, and fuel deposits can build up inside the carburetor, clogging the tiny passages and jets and affecting the air-fuel mixture. This can lead to poor engine performance, difficulty starting, and even stalling while riding.
Regular cleaning can prevent these issues and keep your motorcycle running smoothly. To start the cleaning process, you will need to gather some supplies. These include a carburetor cleaner, a small brush, a clean cloth, and a carburetor rebuild kit (if needed).
It’s also a good idea to have a service manual handy for your specific motorcycle model, as it will provide detailed instructions and diagrams. The first step is to remove the carburetor from the motorcycle. This can vary depending on the make and model, so refer to your service manual for guidance.
Once the carburetor is removed, place it on a clean work surface and carefully disassemble it, taking note of the order and placement of each part. Next, use the carburetor cleaner to spray and clean all the parts, including the jets, passages, and float bowl. The cleaner will break down any built-up deposits, making it easier to remove them with the brush.
Be sure to clean all the parts thoroughly and dry them with a clean cloth before reassembling. If you notice any damaged or worn-out parts, it’s best to replace them with the ones from the rebuild kit. This will ensure that your carburetor is functioning at its best.
Read More
https://motorcyclescleaner.com/conquering-tough-stains-tips-for-deep-cleaning-your-motorcycle/ https://motorcyclescleaner.com/the-top-motorcycle-cleaning-tools-and-accessories-you-need-to-know/
Statistical Information: motorcycle carb cleaning
| Motorcycle Carb Cleaning | Percentage | Facts |
| 1. Importance of Regular Carb Cleaning | 60% | Regular carb cleaning is essential for maintaining the performance and longevity of your motorcycle engine. |
| 2. Signs that Your Carburetor Needs Cleaning | 25% | Some common signs include difficulty starting the engine, poor acceleration, and engine sputtering or stalling. |
| 3. Cleaning Frequency | 10% | Carb cleaning should be done at least once a year, or more frequently if you ride your motorcycle frequently or in dusty conditions. |
| 4. Cost of Carb Cleaning | 5% | The cost of carb cleaning can vary depending on the type of motorcycle and the extent of the cleaning needed, but it typically ranges from $50 to $200. |
| 5. DIY vs Professional Cleaning | N/A | While you can clean your motorcycle carburetor yourself, it is recommended to have it professionally cleaned for optimal results and to avoid potential damage. |
| 6. Benefits of Regular Carb Cleaning | N/A | Regular carb cleaning can improve fuel efficiency, increase horsepower, and prevent costly repairs in the long run. |
Important Notice for readers
Attention all motorcycle owners! If you want your bike to perform at its best, regular carburetor cleaning is a must. In our latest article, we delve into the importance of motorcycle carb cleaning and how it can improve your bike’s overall performance. From the signs that indicate your carburetor needs cleaning to the step-by-step process of cleaning it, we have got you covered.
Don’t wait until your bike starts showing signs of trouble – give it the TLC it deserves and keep it running smoothly. So, rev up your engines and head over to our article now!
Frequently Asked Questions [FAQs]
What is motorcycle carb cleaning and why is it important?
Motorcycle carb cleaning is the process of removing built-up dirt, grime, and debris from the carburetor of a motorcycle. It is important because a clean carburetor ensures proper fuel delivery and can improve overall bike performance.
How often should I clean my motorcycle carb?
It is recommended to clean your motorcycle carburetor at least once a year or every 3,000 miles, whichever comes first. However, if you notice any performance issues or your bike has been sitting for a long time, it may need to be cleaned more frequently.
Can I clean my motorcycle carburetor myself or should I take it to a professional?
While some motorcycle owners prefer to clean their carburetors themselves, it is recommended to take it to a professional if you are not familiar with the process. This will ensure it is cleaned properly and reduce the risk of causing damage to your bike.
What are the signs that my motorcycle carb needs cleaning?
Some common signs that your motorcycle carburetor needs cleaning include difficulty starting the bike, poor fuel efficiency, engine stalling, or a noticeable decrease in performance. If you experience any of these issues, it may be time to clean your carburetor.
Conclusion
It is important to regularly clean the carburetor of your motorcycle to maintain its performance and prolong its lifespan. Neglecting this maintenance task can result in various issues and even lead to costly repairs. By following the proper steps and using the right tools, you can easily clean your motorcycle carburetor at home.
Remember to always refer to the manufacturer’s instructions and seek professional help if needed. Keep your motorcycle running smoothly and efficiently with regular carburetor cleaning. Don’t neglect this crucial maintenance task and enjoy a smooth and hassle-free ride every time.
Leave a Reply