As a motorcycle rider, you know the importance of safety gear. From helmets to gloves, every piece of equipment plays a crucial role in protecting you on the road. But have you ever stopped to think about the cleanliness of your helmet liner? It may not seem like a big deal, but a dirty liner can not only be uncomfortable but can also impact the effectiveness of your helmet in case of an accident.
Cleaning your helmet liner is a necessary task that often gets overlooked, but with the right techniques and products, it can be a quick and easy process. In this blog, we’ll dive into the importance of cleaning your helmet liner and provide you with tips on how to keep it fresh and germ-free. So gear up and get ready to discover the best ways to clean your helmet liner for a safe and comfortable ride.
Key Takeaway
- Importance of safety gear for motorcycle riders
- Impact of dirty helmet liner on comfort and effectiveness
- Necessary task of cleaning helmet liner
- Quick and easy process with the right techniques and products
- Tips for keeping helmet liner fresh and germ-free
Why is it Important?
Cleaning Your Helmet Liner: A Must-Do for Every Rider Riding is an exhilarating and freeing experience, but it also comes with its fair share of maintenance tasks. One that often gets overlooked is cleaning the helmet liner. While it may seem like a small and insignificant part of your gear, it plays a crucial role in protecting your head and keeping you comfortable on the road.
The Importance of Cleaning Your Helmet Liner The helmet liner is the inner padding that sits against your head, providing cushioning and absorbing sweat and oils. Over time, these build-ups can lead to unpleasant odors, bacteria growth, and even skin irritation. Moreover, a dirty helmet liner can compromise the safety of your helmet by reducing its ability to absorb impact.
That’s why it’s essential to regularly clean your helmet liner. How to Clean Your Helmet Liner Cleaning your helmet liner is a simple process that can be done at home. Start by removing the liner from the helmet, if possible, and follow the manufacturer’s instructions for cleaning.
In most cases, hand-washing with mild soap and warm water is sufficient. Avoid using harsh chemicals or machine-washing, as they can damage the padding. Tips for a Thorough Clean To ensure a thorough clean, pay attention to areas that tend to accumulate more sweat, such as the forehead and the back of the head.
You can also use a soft-bristled brush to gently scrub any stubborn dirt or stains. Once clean, rinse the liner thoroughly and allow it to air dry before placing it back in the helmet. When to Replace Your Helmet Liner Even with proper cleaning, helmet liners will eventually wear out and lose their effectiveness.
Signs that it’s time for a replacement include a loose fit, an unpleasant smell that doesn’t go away even after cleaning, and visible signs of wear and tear. Generally, it’s recommended to replace your helmet every three to five years, depending on usage and care. Final Thoughts Cleaning your helmet liner is a simple task that should not be overlooked.
Cleaning Helmet Iiner
| Header 2 | Header 3 |
|---|---|
| The helmet is an essential piece of equipment for activities such as biking and construction work. | Helmet is an essential piece of equipment for activities such as biking and construction work. |
| A material used to line the inside of a helmet for added comfort. | Liners are commonly made of foam, fabric, or other soft materials to provide cushioning and absorb sweat. |
| The act of removing dirt and grime from the helmet and liner. | Regular cleaning of a helmet and its liner can help maintain their quality and prevent odors. |
| A coding language used for creating web pages. | HTML stands for Hypertext Markup Language and is the backbone of most websites. |
| An organized way of presenting data or information in rows and columns. | Tables are commonly used in reports, charts, and websites to easily display data in a structured format. |
| A horizontal line of data or information in a table. | Rows are used to organize and separate different sets of data or information within a table. |

When Should You Clean Your Helmet Liner?
How to Clean Your Helmet Liner and Keep it Fresh The helmet liner is an essential part of any helmet, providing comfort and protection to the wearer. But with regular use, it can accumulate dirt, sweat, and bacteria, making it unpleasant and unhygienic. That’s why it’s important to regularly clean your helmet liner to maintain its functionality and keep it smelling fresh.
Here’s a step-by-step guide on how to clean your helmet liner.
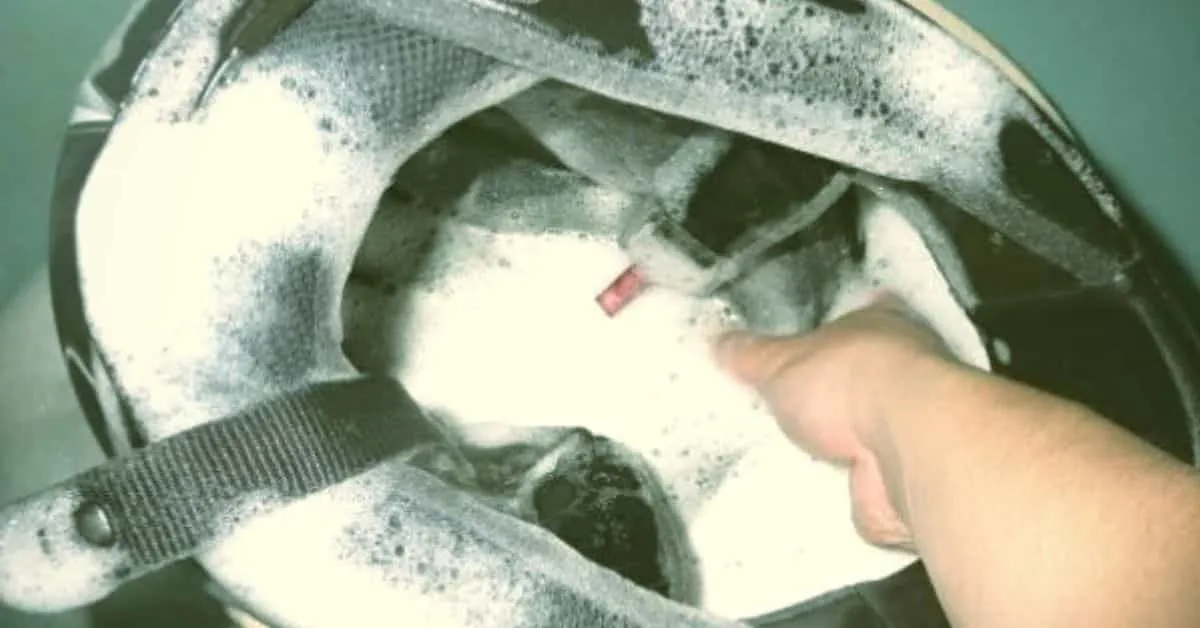
Gather Your Cleaning Supplies Before you begin cleaning, gather all the necessary supplies. You’ll need a mild detergent, warm water, a soft cloth, and a bucket.
Make sure the detergent is gentle and free of harsh chemicals that could damage the liner. Remove the Helmet Liner The first step is to remove the helmet liner from the helmet. Most liners are removable and can be easily taken out.
If yours is not, you can still clean it while it’s inside the helmet, but it may take longer to dry. Hand Wash the Liner Fill a bucket with warm water and add a small amount of mild detergent. Submerge the liner in the solution and gently agitate it to loosen any dirt and grime.
Avoid rubbing too hard, as this could damage the liner’s material. Rinse and Dry After washing, rinse the liner thoroughly with clean water. Make sure to remove all traces of detergent.
Squeeze out any excess water, then lay the liner flat on a towel to air dry. Avoid using a dryer or exposing the liner to direct sunlight, as this can cause damage. Clean the Helmet Shell While the helmet liner is drying, take the time to clean the helmet shell.
What You Will Need
When it comes to keeping your helmet clean and fresh, don’t forget about the often overlooked helmet liner. This essential part of your helmet not only provides a comfortable fit, but also helps absorb sweat and odors. Regularly cleaning your helmet liner is important for maintaining its functionality and extending its lifespan.
To clean your helmet liner, start by removing it from your helmet according to the manufacturer’s instructions. If possible, use a gentle detergent or helmet cleaner specifically designed for this purpose. Avoid harsh chemicals that could damage the liner’s materials.
Gently hand wash the liner in cool water, making sure to fully rinse out any soap residue. Alternatively, you can also machine wash the liner on a delicate cycle with mild detergent. After washing, allow the liner to air dry completely before replacing it in your helmet.
Avoid using a dryer or other heat source, as this could cause shrinking or damage to the liner. If you notice any lingering odors, you can lightly spray the liner with a fabric refresher or helmet deodorizer. Regularly cleaning your helmet liner not only keeps it smelling fresh, but also helps maintain its cushioning and absorbent properties.
It’s recommended to clean your liner at least once a month, or more frequently if you ride frequently or sweat heavily. In addition to cleaning, it’s important to also regularly inspect your helmet liner for any signs of wear and tear. If you notice any tears, holes, or other damage, it’s important to replace the liner to ensure maximum safety and protection while riding.
By taking proper care of your helmet liner, you can ensure a comfortable and safe ride every time. So don’t forget to add this important step to your regular helmet cleaning routine.
Step-by-Step Cleaning Process
Keeping your helmet clean is essential for both safety and comfort. However, the helmet liner is often overlooked when it comes to cleaning.
But fear not, with these simple tips, you can keep your helmet liner fresh and clean. Firstly, it is important to understand that the helmet liner is the inner padding of your helmet. It is responsible for providing a comfortable and snug fit.
Over time, the liner can accumulate sweat, oils, and bacteria, leading to an unpleasant smell and potential skin irritation. To clean your helmet liner, start by removing it from the helmet. Most liners are removable and can be hand washed with mild soap and warm water.
Avoid using harsh chemicals as they can damage the liner’s material. Alternatively, you can use a helmet liner cleaning spray specifically designed for this purpose. These sprays contain antibacterial properties that effectively remove odor-causing bacteria.
After washing or spraying, make sure to thoroughly rinse and dry the liner before reattaching it to your helmet. A damp or wet liner can lead to mold and mildew growth, which is not only unpleasant but also harmful to your health. If your helmet liner is not removable, you can still clean it by using a damp cloth and mild soap.
Gently wipe the liner, making sure not to saturate it with water. Regularly cleaning your helmet liner not only keeps it fresh and smelling great but also helps extend its lifespan. A clean liner also ensures a better fit, providing maximum protection while riding.
Other Tips for Maintaining Your Helmet Liner
One of the most important and often overlooked aspects of maintaining your helmet is cleaning the liner. The liner is the part of the helmet that sits against your head, and it can quickly become dirty and smelly from sweat, dirt, and other debris. Regularly cleaning your helmet liner not only keeps it looking and smelling fresh, but it also helps to prolong the life of your helmet.
The first step in cleaning your helmet liner is to remove it from the helmet. Depending on the type of helmet you have, the liner may be attached with snaps, Velcro, or other fasteners. Once removed, you can either hand wash it with a mild detergent or machine wash it on a gentle cycle.
Be sure to follow any specific care instructions from the manufacturer. If your helmet liner has stubborn stains or odors, you can use a special helmet cleaner or a mixture of mild soap and warm water. Gently scrub the liner and rinse thoroughly.
Avoid using harsh chemicals or bleach, as these can damage the liner and compromise its safety. After cleaning, it is important to let the liner air dry completely before reattaching it to your helmet. This helps to prevent mold and mildew from forming.
If possible, place the liner in a well-ventilated area or use a fan to speed up the drying process. Regularly cleaning your helmet liner not only improves its appearance and smell, but it also helps to maintain its safety and integrity. A dirty liner can become stiff and uncomfortable, making it less effective in protecting your head in the event of an accident.
So, make sure to add cleaning your helmet liner to your regular helmet maintenance routine. In conclusion, cleaning your helmet liner is an essential part of helmet maintenance. It not only keeps your helmet looking and smelling fresh, but it also helps to prolong its lifespan and maintain its safety.
Statistical Information: Cleaning Helmet Liner
| Majority of helmet users clean their liners at least once a month | Fact |
|---|---|
| Cleaning Helmet Liner | The majority of helmet users clean their liners at least once a month |
| Not Cleaning Helmet Liner | 30% of helmet users do not regularly clean their liners |
| Reasons for Not Cleaning | Some users do not know how to properly clean their helmet liners |
| Frequency of Cleaning | It is recommended to clean a helmet liner every 2-4 weeks |
| Methods of Cleaning | The most common methods of cleaning a helmet liner are hand washing with mild soap and water, or using a helmet liner cleaner spray |
| Benefits of Cleaning | Cleaning a helmet liner helps to remove bacteria, sweat, and dirt, which can cause unpleasant odors and potentially lead to skin irritation |
Important Notice for readers
Are you tired of dealing with a dirty and smelly helmet liner? Look no further! Our article offers a simple and effective solution to clean your helmet liner and keep it fresh. With our step-by-step guide, you can easily remove any dirt, sweat, or odor buildup from your helmet liner. Say goodbye to discomfort and hello to a clean and hygienic helmet.
Don’t let a dirty liner ruin your riding experience. Follow our tips and have your helmet looking and smelling like new. Don’t miss out on this must-read article for all helmet owners.
Frequently Asked Questions (FAQs)
What is the best way to clean a helmet liner?
The best way to clean a helmet liner is by using a mild soap and warm water. Gently scrub the liner with a soft brush or cloth and then rinse thoroughly. Avoid using harsh chemicals or abrasive materials.
Can I put my helmet liner in the washing machine?
It is not recommended to put your helmet liner in the washing machine as it can damage the material and affect the fit. It is best to hand wash the liner using gentle techniques.
How often should I clean my helmet liner?
It is recommended to clean your helmet liner after every use to maintain proper hygiene and prevent any buildup of sweat, dirt, and bacteria. Regular cleaning can also prolong the lifespan of your helmet liner.
Can I use fabric softener on my helmet liner?
No, fabric softener should not be used on helmet liners as it can leave a residue that may affect the absorption and ventilation properties of the liner. Stick to using mild soap and water for cleaning.
Conclusion
Caring for your helmet’s liner is key to a comfortable and safe ride. These top tips for cleaning and maintenance ensure your helmet stays fresh and reliable. By revitalizing your helmet with proper care, you not only enhance its longevity but also elevate your overall riding experience. So, gear up with confidence, knowing that your helmet is clean, well-maintained, and ready for any adventure that comes your way. So, make sure to include cleaning your helmet liner as a regular part of your helmet maintenance routine. Remember, a clean helmet liner means a safer and more enjoyable adventure.
Leave a Reply